

This is one heavy photo-loaded post.
Following are the terms I will use to describe what's going on in the setup (may not necessarily be the actual photography jargon):
> Diffuser: Using something translucent (paper, sheet, or cloth) to diffuse the bright, sharp light coming from the window.
> Reflector: Using something white (thermocol sheet, paper, white box) or aluminum foil or mirror or steel plate to reflect light onto food.
> Surface: Using something (paper, cloth, board, anything) to place the food on.
> Backdrop: Using something (paper, board, cloth, drawers, anything) at the back.
Ready?

What I did: used juicer box at the bottom acting as a table, brown grocery bag for surface, using the drawers as black backdrop, white poster sheet used as reflector.
Food: Cabbage Stir-fry - http://
Clicked: Feb 2012

What I did: used white paper (they wrap delicate plates in this kind of paper in the stores) as surface, my outfit used to add color, thermocol sheet as reflector (little candle box used to support the thermocol sheet), glass bowl placed upside down - think outside the box (and the bowl)!!!
Food: avocado and mango salad - http://
Clicked: May 2012

What I did: the same outfit as previous pic used for a mild color to go along with the orange-green salad, used thermocol along with it as surface, the brown chopping board above was used to click the ingredients picture and white chopping board on the side was used to click the avocado pictures (more in link), very simple set-up for a simple photo of food.
Food: avocado and mango salad - http://
Clicked: May 2012

What I did: chopping board used as surface, red folder used as contrasting backdrop to the yellow milkshake, thermocol sheet as reflector supported by a drinking glass that was lying nearby..
Food: Mango Milkshake - http://
Clicked: May 2012

What I did: the same red folder from previous pic used as surface and backdrop supported by a carton filled with my little food props, decided to use that paper napkin underneath to break the plain yellow-red color tones.
Food: sweetened (canned) pineapple made at home - http://
Clicked: April 2012

What I did: it helps to keep accompaniments to food in the picture to add a real table setting kind of feel (here the raita, pickle, onion go along with the paratha), an outfit placed on the left, a yellow paper napkin on the right, and a handmade paper flower on the side just as extra props. [clicked in artificial light, not a favorite pic of mine, but just giving an idea..]
Food: Stuffed Gobi-Methi Paratha - http://
Clicked: Dec 2011

What I did: bright light from window on the left was diffused with a thin white sheet (it came wrapped on some furniture) which was clipped (using clothes pin and binder clips) to the blinds, used chopping board as surface, thermocol sheet used as reflector. placed chopsticks as props to portray "indo-chinese food".
Food: Chili Paneer - http://
Clicked: Feb 2012

What I did: thermocol sheet was used as surface and as reflector. height added to the bowl in the back using another piece of thermocol. instead of just red juice on white placed a light yellow paper napkin to add a little color.
Food: tomato juice - http://
Clicked: July 2012

What I did: Looking at the second picture, could you have guessed where it was clicked? Use the angle that enhances food and blocks out any unwanted lights or shadows (instead of clicking food from random angles). You can even CROP photos to show only what is necessary! Did not need any reflector for this, and used the black background so at least a little steam from tea could be visible (tea wasn't as hot anymore), but you can always add steam to your warm/cold food in two different ways - do you want to know how?
Food: Adrak-Elaichi Chai - http://
Clicked: May 2014
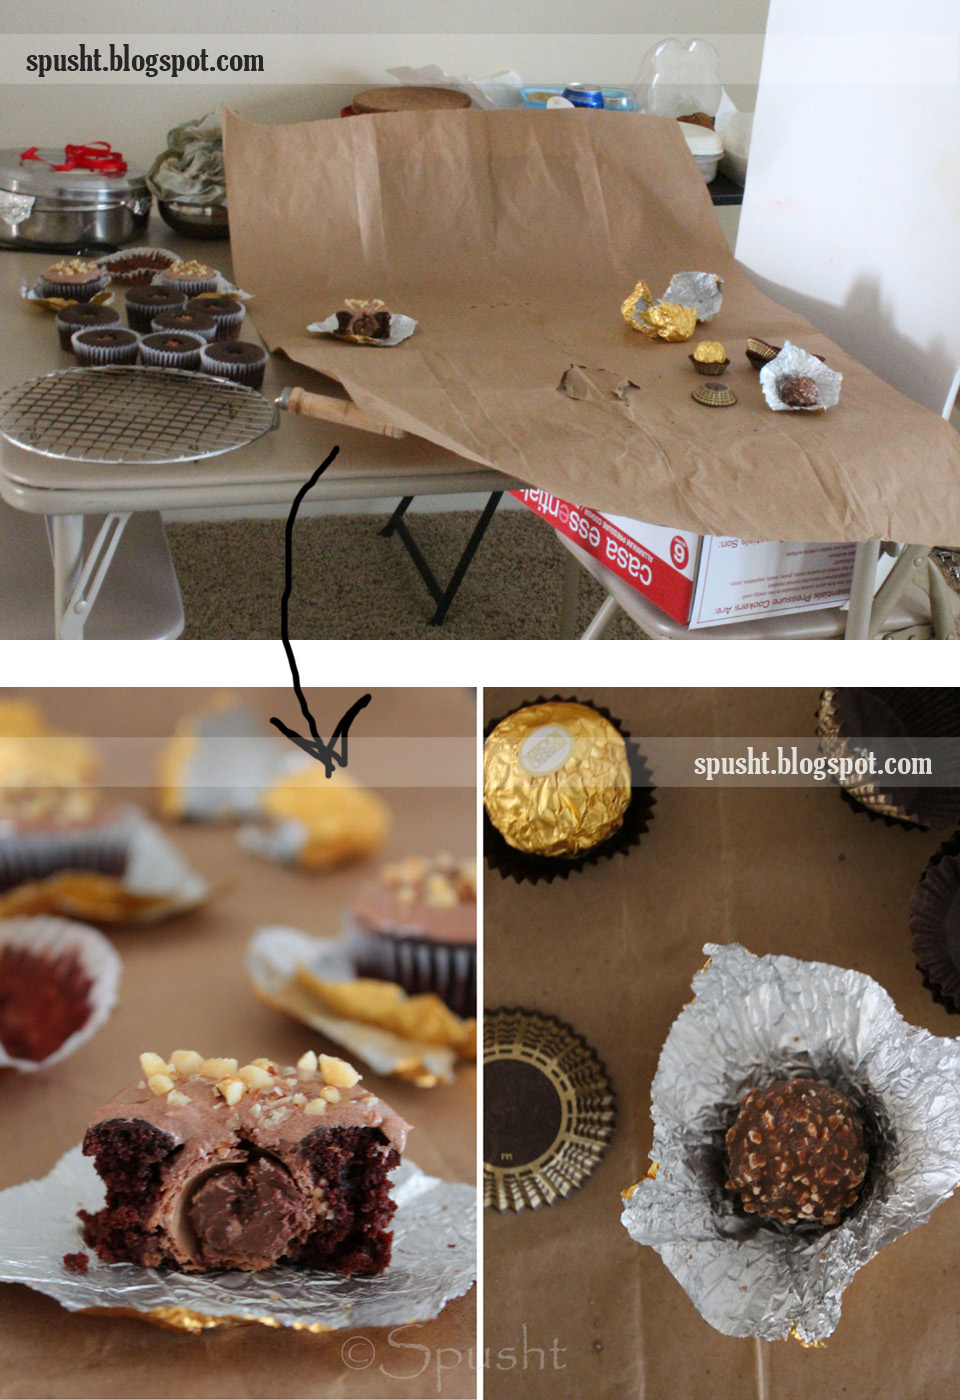
What I did: got this brown paper in packaging and used it as surface, brown food on brown surface or background not really a good idea (but not a rule either!) unless a) different shades of brown and/or b) color tone can be cut by another color - for example golden and silver chocolate wrappers here, photo of chocolates was clicked on one side of paper and photo of cupcakes on another side of the same paper, white reflector poster sheet supported on top of a box on the chair.
Food: Eggless Ferrero Rocher Cupcakes - http://
Clicked: April 2012

What I did: This was a really simple and quick shot with carrots and dip. I didn't have time or planned to make it creative so dipped the carrots in the dip and kept some on the side. Surface is a white paper bag (!!) for a plain background so carrots are clear, and used paper towel roll (!!) as reflector instead of my usual thermocol. You can get an idea of the angle the photo was clicked.
Food: carrot and dip - http://
Clicked: Jan 2013

What I did: another super simple shot. chose a dull color napkin as surface so that pale brown-green color food stands out, added onion and glass of water at the sides that go along with the food instead of any unnecessary props, if you have few roti (or anything) show only part of it or keep on a small plate instead of showing a big plate with small quantity, hence only the side portion with roti is visible in final click.
Food: Green Beans in Tomato Gravy - http://
Clicked: Jan 2013

What I did: upside down photo frame as surface, used a block of thermocol to add height to the square chutney bowl since I wanted the tall blender jar in picture too, added green chilies and lemon on the side, it's good to show some ingredients in the final picture, didn't have any cilantro leaves left hence just one in the center on the chutney, didn't need reflector for this, and I totally forgot to hide or edit (in photoshop) the photo frame hook on the left. oops.
Food: Cilantro (Coriander Leaves) Chutney - http://
Clicked: Feb 2013

What I did: colored some plain A3 papers and used them as surface. added a contrasting color (purple surface) in the photo for the yellow raw mango. placed the subject (raw mango plate) between the papers and spice mix on the plain side of paper since the bowl design was colorful enough. used thermocol as reflector (which was supported by my handbag) for the light coming from right side of subject.
Food: raw mango and a spice mix
Clicked: July 2014

What I did: Crumpled paper makes a good surface. Brown food and blue base seem to always go together. So I used a pretty and bright blue pouch as the surface (the entire pouch need not be visible in the final picture), the same crumpled paper raised to form the backdrop (a bottle lying nearby is supporting the paper). Used thermocol reflector. Even if it is a small quantity of food you have place it in a way that the shape, size, texture is apparent. This portion of my kitchen counter has good light especially at 5 pm, hence shot it here instead of the usual bed-studio setup.
Food: "Fal" made for Gangaur Festival - http://
Clicked: April 2013

What I did: black styrofoam tray used for base and black plastic fork used for prop, added a white paper napkin on the side, brown packaging paper as surface, and white A4 sheet paper (YEP, works!) used as reflector supported by red vase (because the vase and brown chopping board were used on the other side for other photos, powdered sugar and sieve to dust sugar on top just before clicking (more clicks in link).
Food: Cakey Brownie - http://
Clicked: Feb 2012

What I did: turned my usual photo frame over because I love the neutral color it has which goes along well with all colors. used a blue cardstock sheet as the surface. added a small grey cloth over it (you get this stuff for cleaning sunglasses), placed my subject (vegetable stock bottle) over it and the lid of the bottle nearby. white thermocol sheet used as reflector, supported by a small box. photo clicked from opposite side of the source of light (which is the window), hence the little moody/dark effect.
Food: Vegetable stock/broth - http://spusht.blogspot.com/2013/06/homemade-vegetable-stock-how-to-make-broth-at-home.html
Clicked: May 2013
Do you want to see more behind-the-scenes food photography photos and posts? Were my tips and tricks helpful?
. . . . . . . . . . . . . . . . . . . . . . . .
More Food Photography Posts:
Part 1: Light
Part 2: Makeshift Props on a Budget
Part 3: Small Changes, Small Differences
Part 4: Behind-the-Scenes
Come connect with me! on Facebook | Email | RSS | Twitter
Bravo Nisha. This is excellent. I now understand why your tagline is simple, clear and straightforward. Thanks a bunch and accept my bouquet.
ReplyDeleteSuch a helpful article for struggling photographers like me... thank you for sharing a lot of your wisdom! :)
ReplyDeleteI’ve tried all three diets- veganism, vegetarianism, and a meat diet and I’ve always felt the healthiest with a vegan diet. Eating meat always made my energy levels decline and milk and eggs did the same but to a lesser degree. Plenty of protein can be found in so many natural vegan sources so the myth that vegans don’t get enough protein is wrong too. Keep up your good work.
ReplyDeleteThanks a bunch Nisha...truly speaking..u r magnanimous to share this much...how many would take this effort. Can u share which camera so u use?
ReplyDeleteexcellent posts on food photography!! Please keep going
ReplyDelete