
 |
| how to create visual index on your blog |
Sayantani
said: “so
well executed recipe index. love it. did you use any special s/w?”
Jyoti
said: “That's really nice.. Would like to know ow you
did it.. I have an index on my blog but really want a photo index..”
Shumaila
said: “I wanted to make a photo index as well but
couldn't figure out how. This looks good!”
Seeing the comments above on the simple photo index,
I thought of sharing how I made the index – so that fellow bloggers can
help their readers browse and enjoy their blog better.
I
see longgggg recipe indexes on numerous blogs, divided well into categories and
cuisines. But it annoys me to right
click and open each page in a new tab to see what the dish looks like. It might earn a blogger several pageviews,
but it might lose a reader, especially the kinds with short attention span like
mine. Being Spusht, I wanted the index on my blog with a picture to give a picture
of what to expect – simple and clear.
I am
no HTML expert (took me a year to figure out how to add social media buttons on this blog, so you can imagine) and I did not use any
software. I am a Microsoft Office expert
and this recipe photo archive was made on Microsoft Word. It is SO super simple to make a photo index on blog with the help of MS Word.
This easy method to create a visual index can be used for your crafts blog, cosmetics or fashion blog, an index page for your gadget or restaurant review blog, or ANY kind of blog that you have.
Here's what you have to do - you just have to create a table in Microsoft Word and copy-paste it to your blog page. That's it. A detailed explanation for the visual learners:
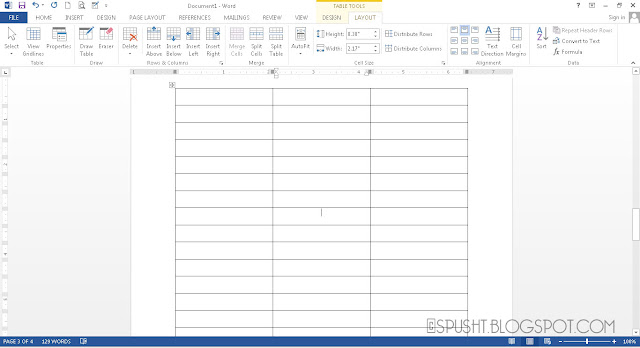
1. Insert > Table > Choose the number columns based on the width of the body of your blog. I chose to have 3 columns because that looks decent enough - not too big images to scroll, not too small to see.
 |
| create table in MS Word |
 |
| copy table from MS Word to blog page |
With your mouse cursor in each column, INSERT IMAGE of your recipe - upload from your computer, or insert from online album. Click on the image - position it in the Center/Left/Right and select the Small/Medium size. Then LINK the image to its blog post using Add/Remove Link button. Select to have each link open in a new window, and then ADD CAPTION as the name of the recipe. (If you add caption first then link it up, even the caption gets hyperlinked and I do not like that, just my preference - feel free to do it either way.)
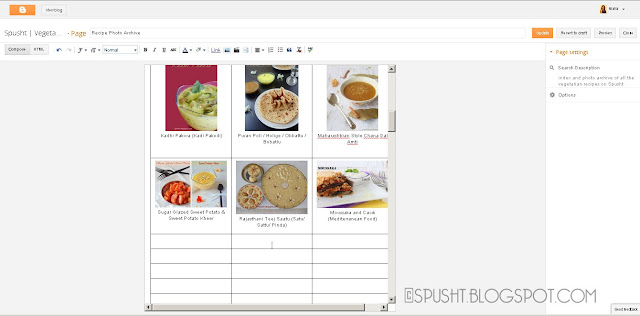 |
| add images and link to blog posts in your photo index archive |
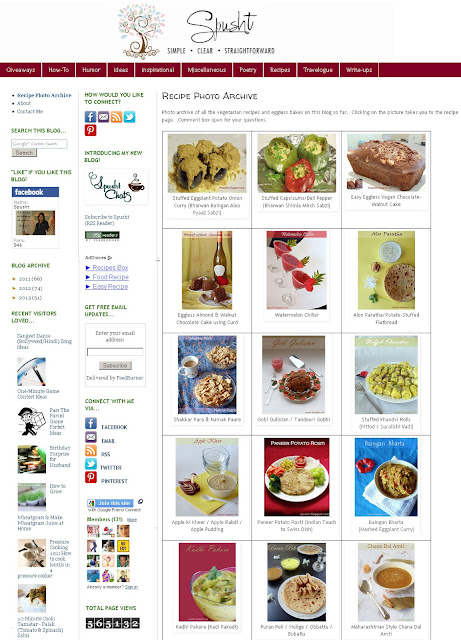
4. Once you finish adding all the images, the blog post links, and the captions - adjust the font and size of the text, check your alignment, PREVIEW the page to see if everything fits well and looks good. PUBLISH your page, and test if each photo is linked to its blog post. If you roll your mouse over the image, you should see a hand instead of a cursor and the blog post address link at the bottom left corner of your browser.
 |
| how to make a photo index on your blog - simple and easy |
Make things easier for your readers - because that's what will keep them coming back to your blog.
Previously...
Blogging Tip # 5: Tips for bloggers to save time
Blogging Tip # 4: Adding social network icons on blog
Blogging Tip # 3: How to set your RSS feed
Blogging Tip # 2: Creating Facebook page and NetworkedBlogs
Blogging Tip # 1: Adding contact form to your blog
If this post helped you and if you will apply this blogging tip on your blog - leave me a comment to tell me about it (it will make me feel proud to know this post was worth my time). If you find this tip and this blog useful - share the link with people in your network to let them know too (it will make me happy).
. . . . . . . . . . . . . . . . . . . . . . . .
Come connect with me on Facebook | Email | RSS | Twitter